Launchpad v1
Learn more about the Launchpad to allow your users to see Flows on demand.
Table of Contents
Please note that Launchpad (formerly known as the "in-app widget" or "announcement center") is available as a feature only in our Growth plans and above. This article describes the behavior of the current version of the Launchpad.
Launchpad v2 is now available
Take a look at our new and improved launchpad. Spin up your in-app resource center without touching a line of code!
What is Launchpad?
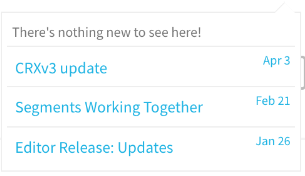
The Appcues Launchpad allows users to access Appcues flows from a notification dropdown within your product. It looks and behaves something like this:

Launchpad is a great way to provide in-product tutorials and announcements without intruding upon your user's experience. It also allows your users to replay/relaunch a flow they've seen previously.
Installing Launchpad
Before you can use Launchpad, it will need to be installed first by your development team. There are two ways to install Launchpad, each with its own caveats:
- Standard Launchpad Install - this installation method will allow your team to quickly use boilerplate code in implementing Launchpad. However, customizing how your Launchpad looks is limited only to what's possible in the install guide. It won't be possible to add external links into the Launchpad as well as any functionality beyond showing flows.
- Custom Launchpad Install - this installation method will allow Launchpad to be fully customizable for your team to allow other functionalities to be included in the Launchpad (like styling, adding links, and inserting widgets). However, this method means that your development team will have to develop the implementation code themselves, using the APIs we provide. We don't have an installation code for this so Launchpad will be implemented from scratch.
Configuring Flows to show in Launchpad
Flows published in your account will not automatically show up in Launchpad. After the feature is turned on for your account, you'll notice a new 'Launchpad' section on the flow settings page that will allow you to add the flow to the Launchpad.
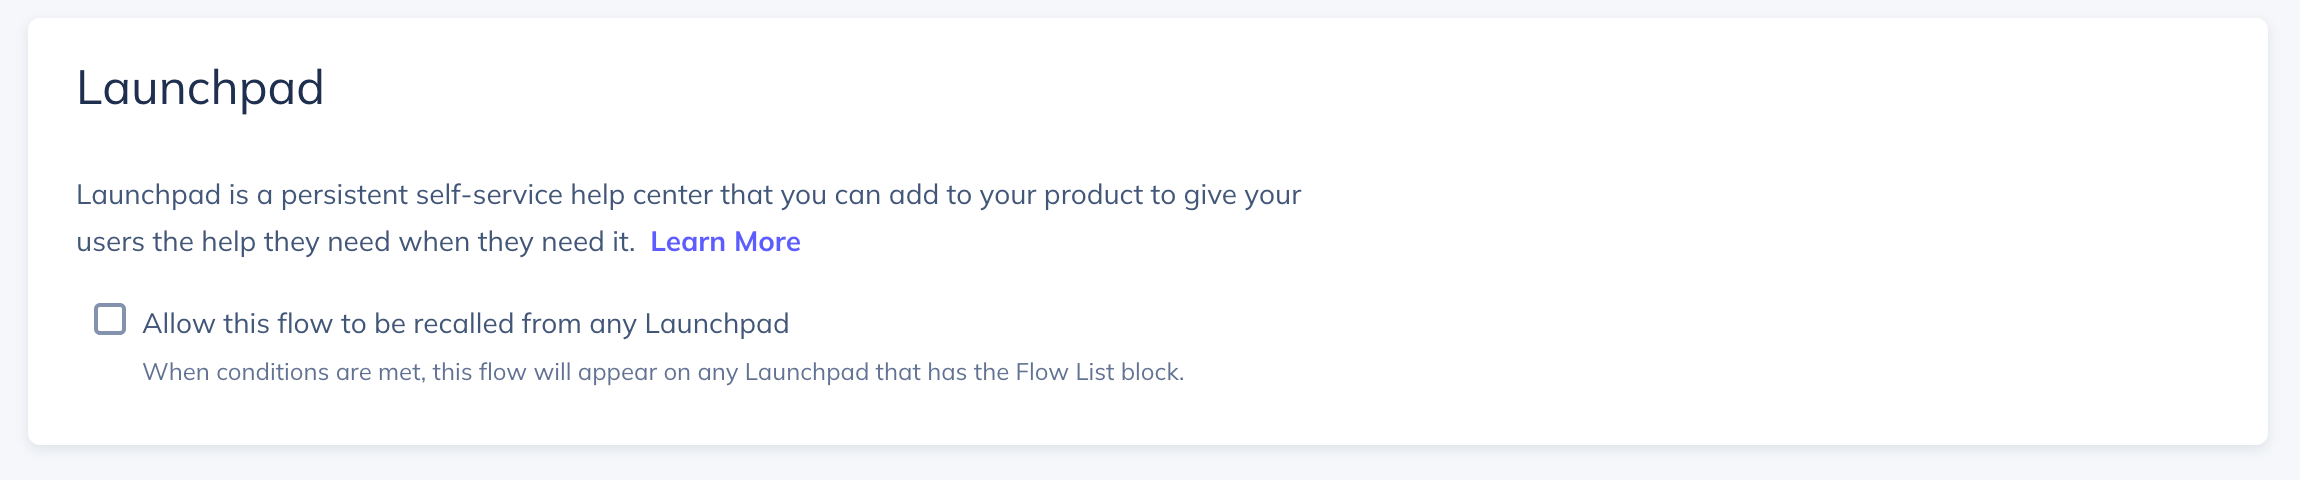
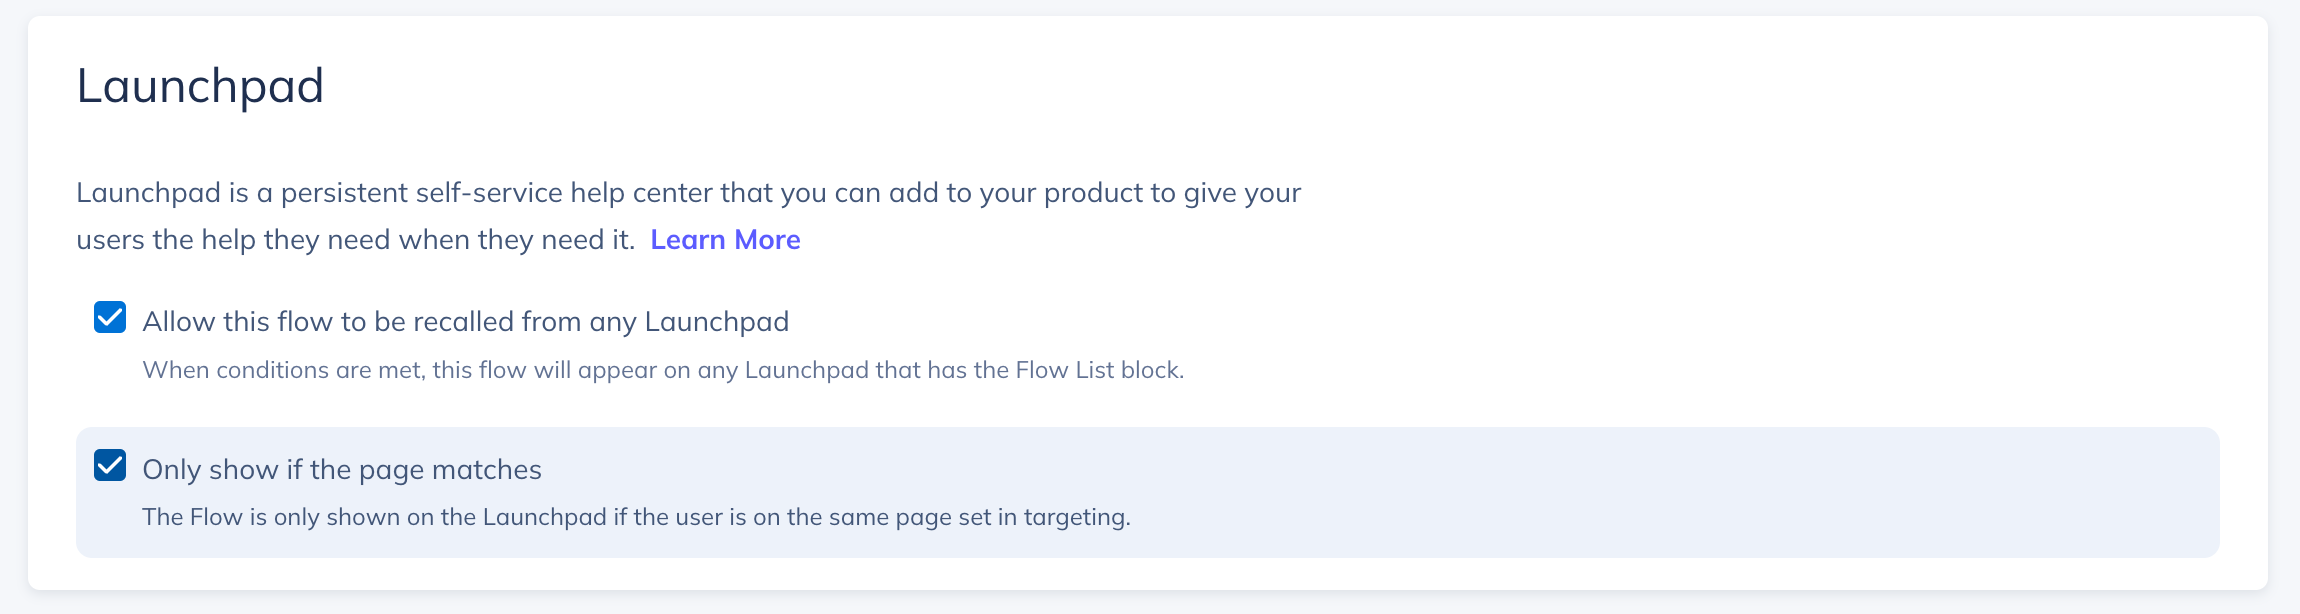
You'll need to explicitly set flows to show in Launchpad by checking the box for ‘Allow this flow to be recalled in any launchpad’. When this is selected an ‘Only show is the page matches’ checkbox will display:
- Only show if the page matches selected (default) - This will allow the flow to show in Launchpad only when the user is on a page that satisfies the 'Page targeting' settings of the flow. Best used for targeting flows to Launchpad on only one specific page. For instance, if you publish a flow to the /analytics URL path, it will only be accessible within Launchpad when users are on pages that match that criteria
- Only show if the page matches unselected - This will make the flow show in the Launchpad on all pages where Launchpad is installed. Best used to allow flows to be viewed as "notifications", no matter which pages the end-user is on in your application
The Launchpad respects audience targeting. This means that if you have specific audience targeting in your flow and you set it to show in the Launchpad, it will only appear to those users.
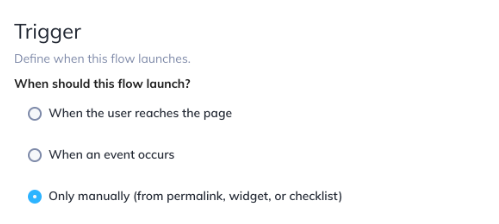
You can set the flow to only 'Show Manually' via Launchpad, and never pop up automatically for any user. To do this, select "Only manually" in your Trigger settings.
Flows that are triggered by an event will not show up in the Launchpad even if the option is selected.
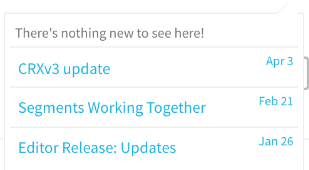
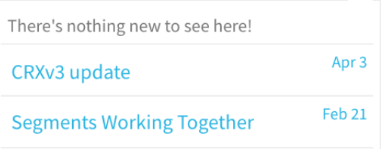
With the standard install, any flows that are set to show Launchpad, but have already been viewed by a user, will be shown below the 'Nothing new to see here' message. The Launchpad icon will only display the "counter badge" if there is new content that has not been viewed.
Launchpad v1 Standard installation
1. Add an HTML element to your site where Launchpad will live
//Note that the id can be anything you'd like
<div id="my-launchpad"></div>
2. Create a Launchpad instance for the current Appcues visitor with the following JS:
Appcues.loadLaunchpad("#my-launchpad", {
	//Optionally specify the position of the content relative to the Launchpad icon. Possible values are as followed:
	//	- center (default value, i.e. bottom-center)
	//	- left (i.e. bottom-left)
	//	- right (i.e. bottom-right)
	//	- top (i.e. top-center)
	//	- top-left
	//	- top-right
	position: "left",
	// Optionally add a header or footer. This must be HTML.
	header: "<h1>Tutorials</h1>",
	footer: "<p>Your footer here</p>",
	// And if you'd prefer to use a custom icon rather than the default "bell" icon, you can optionally pass
        // in an icon as well. Make sure that src is set to the right resource, whether it's in your site's directory or hosted
	icon: "icon.png"
});
Targeting and Customization
After the feature is turned on for your account, you'll notice new options in the UI of the flow settings page. Flows published in your account will not automatically show up in Launchpad. You'll need to explicitly set them to show in Launchpad.
Any flows that are set to show Launchpad, but have already been viewed by a user, will be shown below the 'Nothing new to see here' message. The Launchpad icon will only display the "counter badge" if there is new content that has not been viewed.
Customization
Any Launchpad style customizations in the Standard install will need to be added directly to your application's CSS, and not in Appcues.
Modify the Icon
By default, we'll add in a bell icon for you, but you can also use your own icon by passing it into the Appcues.loadLaunchpad SDK function. Check out the installation instructions above for an example.
Modify the Copy
You can add custom CSS to your page to hide either the date and/or the "nothing new to see here" items you see below.
Remove the 'Nothing new to see' message:
li.appcues-nothing-new {
	display: none;
}
Remove the date
a[data-itemid] time {
	display: none;
}
Remove the count of 'unread' flows
.appcues-widget-icon:after {
	display: none !important;
}
Hide the Launchpad icon when there’s nothing new to see
.appcues-widget-icon[data-appcues-count="0"]::after {
    display: none;
}
Add a drop-shadow (this is an example, feel free to change the optional parameters to match your brand: offset-x offset-y blur-radius color)
.appcues-widget-dropdown {
	filter: drop-shadow(4px 4px 3px #D7D7FF);
}Note: If you decide to use CSS to further modify the look and feel of Launchpad we're all about it, but be sure to style both the 'read' and 'unread' items to ensure that it functions properly
As always, if you have questions on the above, please reach out to us at support@appcues.com, we're happy to assist!
Change the order the Flows are listed
The Launchpad currently uses the published flow order as flow priority. To adjust the order of the flows in Launchpad republish the flows, the most recently published flow will be at the top of its section (unseen vs seen) and the least recently published flow at the bottom of the list.
Launchpad v1 Custom installation
Once you've made the decision to utilize Launchpad, you can decide which installation method you'll want to use depending on how far you want to customize your Launchpad. The Custom Launchpad Install offers these characteristics:
- Implementation difficulty is dependent on the functionalities you want to be included (on a rush for a quick implementation of Launchpad? Try our Standard Launchpad Install!)
- FULL customization (want to add a widget or redirect users to a page? it's possible!)
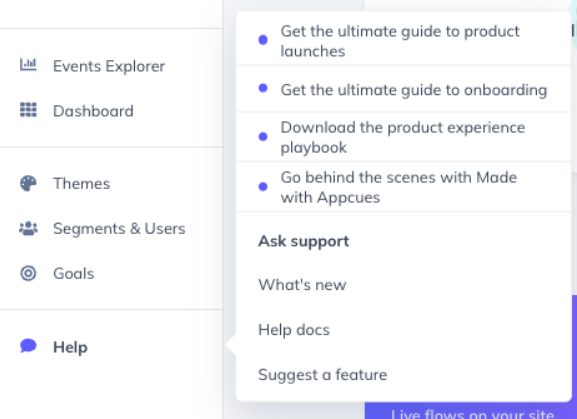
An example would be our very own 'Help' beacon in Studio. You can read more about how we used Launchpad in this article: How we used Launchpad to create a resource center.
Installation Process
The Custom Install method will only offer APIs so your development team can implement the Launchpad to your application's own preference, allowing full granular control of how it should look like! There will be no installation templates for this method, as it will have to be created on your end due to its custom nature.
Introduction
The Appcues API provides an HTTP endpoint for accessing all the content that a user is qualified to see within the Appcues Launchpad.
Connecting
The root URL for the Appcues API is https://api.appcues.com/.
The URL to fetch the list of content is formed using your Appcues account ID (visible from your Appcues account page) and the end user's ID (the first parameter to your site code's Appcues.identify() call), as follows:
https://api.appcues.com/v1/accounts/{account_id}/users/{user_id}/launchpadRequest Format
The user activity endpoint accepts only GET requests.
The request should contain the following query parameter:
url The URL of the current page the user is on. This is used for page-level filtering and should be fully encoded to ensure an accurate response. For quick testing, a URL encoder like https://meyerweb.com/eric/tools/dencoder/ can be helpful.
An example would be:
https://api.appcues.com/v1/accounts/{account_id}/users/{user_id}/launchpad?url=https://yoursite.com/dashboardRequest headers
The Authorization header is required if your account is using Identity Verification. The Authorization header should include the UserID signature and use the following format:
Authorization: Bearer {user id signature}Response Format
A successful user activity submission will result in a response with status code 200, and a response body like the following:
{"request_id":"abc123","contents":[]}request_id Request_id specified in the request, if any.
contents An array of content for which the user currently qualifies. Used internally by the Appcues SDK; safe for external users to ignore.
Example response of what you might receive (actual response may vary):
{
  "checklists":[

  ],
  "contents":[
     {
        "attributes":{
           "created_at":1646163441985,
           "created_by":"uRAZUSQ2mDdNDkJMTAs4u3IEmA62",
           "id":"3211a0f6-ff2f-4feb-97a4-5fe994b8a25e",
           "internal_name":null,
           "name":"Localization Test",
           "state":"PUBLISHED",
           "steps":{
              "34a19398-4dbb-4b1c-acd2-5f675e7c3afb":{
                 "id":"34a19398-4dbb-4b1c-acd2-5f675e7c3afb",
                 "index":1,
                 "step":{
                    "attributes":{
                       "backdrop":false,
                       "backdrop_solid_edge":false,
                       "backdrop_solid_edge_opacity":0.5,
                       "beacon_style":"hidden",
                       "hotspots":[
                          {
                             "backdrop_solid_edge_border_radius":0.0,
                             "backdrop_solid_edge_x_padding":0.0,
                             "backdrop_solid_edge_y_padding":0.0,
                             "backup_selectors":null,
                             "hide_next_button":true,
                             "html":"raw html of step",
                             "id":"a21b1c23-be6a-4551-9193-cfbbda121398",
                             "index":0,
                             "next_text":"Next",
                             "offset_x_percentage":0.08125707814269535,
                             "offset_y_percentage":0.09948320413436693,
                             "pattern":null,
                             "selector":".property-setter p:nth-of-type(1)",
                             "selector_settings":{
                                "selector":".property-setter p:nth-of-type(1)"
                             },
                             "skip_text":"Hide these tips",
                             "tooltip_alignment":null,
                             "ui_conditions":{
                                "next":null
                             },
                             "z_index_override":null
                          }
                       ],
                       "sequential":true,
                       "skippable":true,
                       "skippable_display_type":"text",
                       "style":null
                    },
                    "created_at":1646163441992,
                    "flow_id":null,
                    "id":"34a19398-4dbb-4b1c-acd2-5f675e7c3afb",
                    "migrated_from_step_id":null,
                    "name":null,
                    "next_content_id":null,
                    "parent_id":null,
                    "redirect_new_tab":false,
                    "redirect_url":null,
                    "type":"hotspot-group",
                    "updated_at":1646163441992,
                    "version_id":1646163441992
                 },
                 "step_type":"hotspot-group"
              },
              "a7bb2572-f410-4bf2-b672-91943bd6ac9e":{
                 "id":"a7bb2572-f410-4bf2-b672-91943bd6ac9e",
                 "index":0,
                 "step":{
                    "attributes":{
                       "backdrop":true,
                       "is_progress_bar_hidden":false,
                       "pattern_type":"modal",
                       "position":"top",
                       "skippable":true,
                       "steps":[
                          {
                             "actions_hidden":false,
                             "html":"raw html of step",
                             "id":"f2bf8d53-05c2-4d51-ad3d-f821b4d46986",
                             "is_button_centered":true,
                             "next_button_hidden":false,
                             "next_text":"Let's go!",
                             "prev_button_hidden":false,
                             "prev_text":"Cancel",
                             "step_buttons":[

                             ],
                             "step_number":1,
                             "ui_conditions":{

                             }
                          }
                       ],
                       "style":null
                    },
                    "created_at":1646163441989,
                    "flow_id":null,
                    "id":"a7bb2572-f410-4bf2-b672-91943bd6ac9e",
                    "migrated_from_step_id":null,
                    "name":null,
                    "next_content_id":null,
                    "parent_id":null,
                    "redirect_new_tab":false,
                    "redirect_url":null,
                    "type":"modal",
                    "updated_at":1646163441989,
                    "version_id":1646163441989
                 },
                 "step_type":"modal"
              }
           },
           "updated_at":1646163440192,
           "updated_by":"uRAZUSQ2mDdNDkJMTAs4u3IEmA62",
           "version_id":null
        },
        "context":{
           "locale_id":"default",
           "locale_name":"default"
        },
        "created_at":1646163441985,
        "format_version":2,
        "id":"3211a0f6-ff2f-4feb-97a4-5fe994b8a25e",
        "migrated_from_step_id":null,
        "name":"Localization Test",
        "next_content_id":null,
        "parent_id":null,
        "redirect_new_tab":false,
        "redirect_url":null,
        "type":"journey",
        "updated_at":1646163440192,
        "version_id":1646163440192
     }
  ],
  "experiences":[

  ],
  "performed_qualification":true,
  "profile":{
     "_ABGroup":2
  },
  "qualification_reason":null,
  "request_id":null
}