View Form & Survey Results
Learn how to view your form and surveys responses with Appcues
Table of Contents
After you publish a Flow with a form or survey, review user responses on the Flow's analytics page or export them as a CSV.
View responses in Studio
- Open Flows and select the Flow that contains your form or survey.
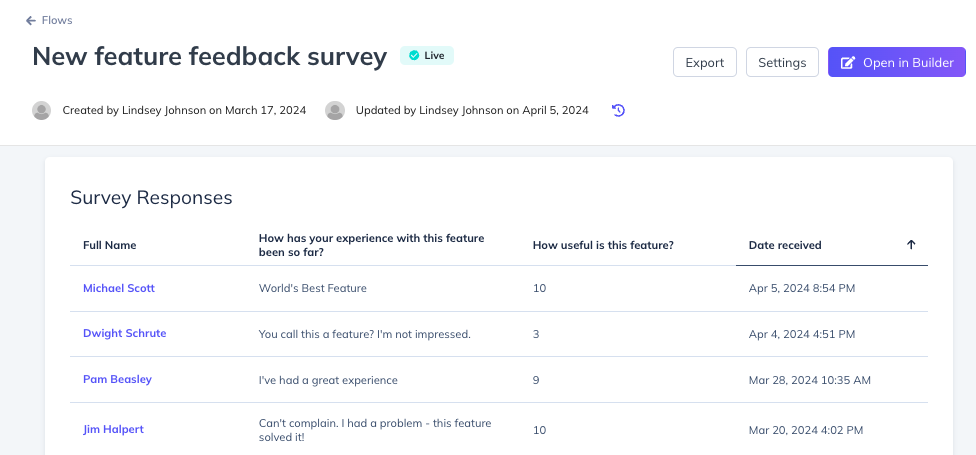
- Click the Analytics tab. Scroll down to the survey response table.
- The table displays one row per response, with columns for user identifier, each question, and the date and time the response was recorded.
- (Optional) Adjust the date range filter at the top of the analytics page to narrow or expand the data shown.
If you know your survey has collected responses but the table is empty, check the date range filter. It may be excluding the time period when responses were submitted.
Change the user identifier column
By default, the first column in the survey table shows the user ID. To display a friendlier identifier like full name or email, change the account identifier.
Understand column headers
Column headers in the survey response table come from the labels you set in the Builder:
- Mobile Flows — The question label you entered in the Appcues mobile Builder appears as the column header.
-
Web Flows — Appcues checks for labels in this order:
- Custom Reporting Label (set in the survey component settings in the Builder)
- Question Label (the label end users see)
-
Auto-generated label — If no labels are set, Appcues generates a header like
radio-abcde-12345-a1b2c3. To fix this, open the Builder and add a Custom Reporting Label in the survey component settings.

Export survey responses
- Open the analytics page for the Flow.
- Click Export at the top of the page.
- Select Survey.
The export generates a CSV with one row per user. Each row contains the user's most recent response per field and the timestamp of their last submission.
The survey export only includes each user's latest response. If a user answered the survey more than once and you need all responses, use the Full export instead. See the next section for details.
Parse form responses from a Full CSV export
The Full and Basic CSV exports include individual form field submission events. This requires more manual work but gives you access to data the Survey export does not include.
When to use the Full export
- You need to correlate specific user properties with each response at the time it was submitted.
- You need to see every response, not just the most recent one.
- You want to calculate the timing of when each form field was completed.
- You have other advanced analysis needs that require viewing each form event separately.
If none of these apply, use the Survey export described above.
Open and filter the CSV
- Download the CSV from the email Appcues sends you. The file arrives in
.zipformat — extract it to get the.csvfile. - Import the CSV into a spreadsheet tool (Google Sheets or Excel).
- In Google Sheets, go to File > Import and upload the file. The default import settings work for a new sheet.

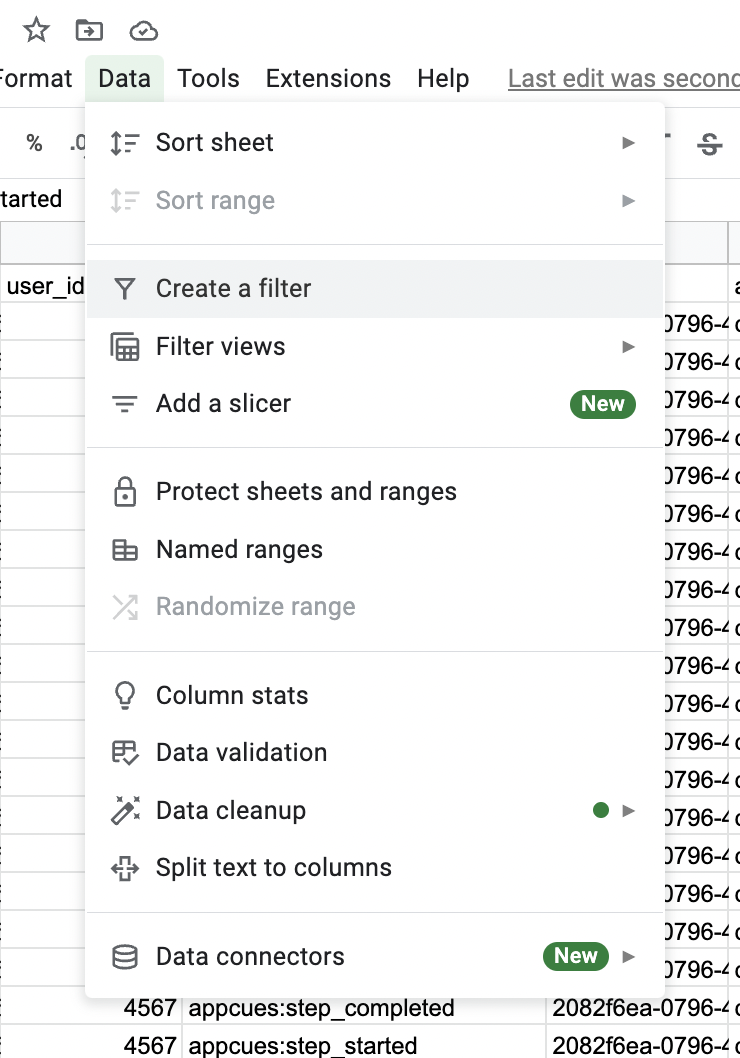
- Apply a filter to the spreadsheet.
- In Google Sheets, go to Data > Create a filter.
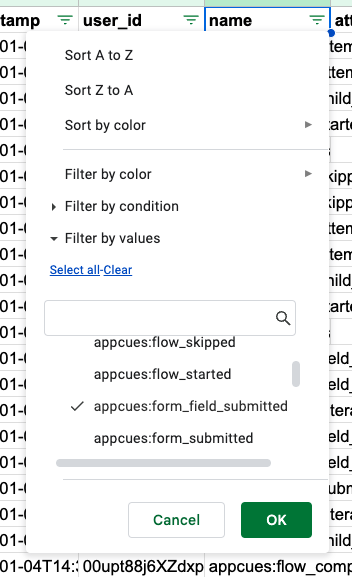
- Filter the name column (typically column D). Clear all filter values, then search for
appcues:form_field_submitted. - Locate the response data:
- Each form field has a column titled
attributes.interaction.valuefollowed by the question or label for that field. The user's answer appears in that column. - The
attributes._identity.userIdcolumn identifies which user submitted each response.
Confirm it worked
- The survey response table on the analytics page shows rows of user responses with timestamps.
- A downloaded Survey CSV opens in your spreadsheet tool with one row per user and their latest responses.
- A filtered Full CSV shows individual
appcues:form_field_submittedevents tied to specific users.
If the data doesn't look right
- No responses in the table — Adjust the date range filter at the top of the analytics page.
- No responses even though the flow is being seen – make sure the submit button is set to next. See Create Forms and Surveys.
-
Column headers show auto-generated labels (e.g.,
radio-abcde-12345-a1b2c3) — Open the Flow in the Builder and add a Custom Reporting Label in the survey component settings. - Survey export only shows one response per user — This is expected. Switch to the Full export if you need all responses.
-
Can't open the CSV — Make sure you extracted the
.zipfile first. On Mac, click the file to extract automatically. On Windows, use a tool like WinZip or 7-Zip.
If you're still having trouble, collect the Flow ID, the date range you're filtering by, and a screenshot of what you see, then contact support.