Create and style Launchpads
Learn how to create Launchpads with Appcues
Table of Contents
Set up an in-app content center and customize its appearance to match your brand.
Prerequisites
- The Appcues Chrome Extension installed (required for inline beacon placement and previewing).
Create a Launchpad
- Go to Experiences and click New experience.
- Select Web, then Launchpad. The Launchpad builder opens and asks what type of widget should open the Launchpad.
- Choose the beacon type:
- Floating: A fixed icon that sits on top of the page and stays in the same position while scrolling.
- Inline: An icon embedded into your page layout, positioned relative to a target element. Use this when you want the Launchpad to feel native to your app's navigation.
- Enter a name and click Create. The Launchpad opens in the builder.
To switch between Floating and Inline later, open Settings and use the dropdown at the top of the Launcher section.

Set up beacon placement
Floating
Floating beacons appear in the bottom corner of the page.
- Click the Settings (gear) icon in the builder's top bar. The Settings tab opens.
- In the Launcher section, set Position to Left or Right.
- Enter a Distance from side and a Distance from bottom in pixels, up to 512, to clear other UI elements in that corner.
Inline
Inline beacons are placed into your page using the Appcues Chrome Extension.
- In Settings, under Launcher, click Set launcher placement. If the Launchpad has no preview URL yet, you're asked for one.
- Enter the URL of the page where you want to place the beacon. The Chrome Extension opens on that page.
- Select the target element. The fine-tune position panel appears with three embedding options:
- Inline Left: The beacon displays to the left of the content inside the target selector.
- Inline Right: The beacon displays to the right of the content inside the target selector.
- Overlaid: The beacon is overlaid on top of the content in the area of the target selector.
- Customize the CSS selector and adjust positioning as needed. To change it later, click Adjust placement, which replaces Set launcher placement once a target is set.

Add content blocks
Click the blue + icon in the builder's preview panel to add content blocks. Each Launchpad supports five types: Links, Flow List, Text, Image, and Javascript. Each block sits on its own card, which you can restyle. See Style block cards.
To undo a change, click the Undo arrow at the top of the builder or press Cmd+Z (Ctrl+Z on Windows). Press Cmd+Shift+Z (Ctrl+Shift+Z) to redo.

Links block
A Links block is a group of items you define manually. Each item can open a URL, trigger a published Flow, or run a JavaScript snippet.
- Click + and select Links.
- Click the block to open its settings. On the Content tab, click the pencil icon on an item to edit it, or click Add Link.
- Choose what the item does:
- Go to URL: Opens an external link (your blog, changelog, support page, etc.). Turn on Open in new tab to keep your app open.
- Trigger Flow: Launches a published Appcues Flow.
- Run JavaScript: Runs a snippet you choose, such as one that opens your support chat. See Add JavaScript snippets.
Under Additional options, you can also track an event or update user properties when someone clicks the item. Use these to target users by how they use the Launchpad.
To show the items as a vertical list or a horizontal grid, open the Design tab and choose List or Grid.
Flows added as items in a Links block are always displayed and do not respect audience targeting.

Flow list block
A Flow list block shows the published Flows the current user qualifies for.
- Click + and select Flow List.
- On the Content tab, set Order Priority:
- Flow priority: Orders Flows based on your Flow Priority settings.
- Most recently updated: Shows the most recently updated Flows first.
- Set Max flows displayed.
- Open the Flow List tab to see which Flows will appear, assuming a user qualifies for all published Flows.
Flows in a Flow list block respect audience targeting. Users only see Flows they qualify for. To configure which Flows appear in Launchpads, see Make it available in a Launchpad.

Text block
Use a Text block for an intro, a note, or instructions.
- Click + and select Text. The block appears on a card.
- Type your text in the preview.
To turn part of the text into a link, highlight it and turn on Action on click. A text link can go to a URL, trigger a Flow, run JavaScript, track an event, or update user properties.

Image block
- Click + and select Image.
- Upload an image. It fills the width of the card.
- Choose Fit, Fill, or Fixed sizing. Use Fixed to limit the height of a tall image.
- On the Design tab, set the alignment to Left, Center, or Right. New images are centered.
An image can also run an action when someone clicks it, including Run JavaScript.

Javascript block
Use a Javascript block to show content from a snippet, such as a scheduler or a third-party widget, inside the Launchpad.
- Click + and select Javascript.
- Choose a snippet from the Snippet dropdown and fill in its variables.
The snippet runs on the published Launchpad, not in the builder. To create a snippet, see Add JavaScript snippets.
If the snippet renders nothing, the published Launchpad shows an empty card.

Style your Launchpad
You style a Launchpad at three levels: the container, the beacon, and each content block's card. If the Launchpad uses a Theme, all three follow it, and a change you make in the builder overrides the Theme for this Launchpad only.
Use a Theme
- Click the Settings (gear) icon in the builder's top bar and open the Styles tab.
- Choose a Theme in the Theme dropdown. The header, colors, corner radius, beacon, and block cards change to match it, and Text blocks take the Theme's paragraph and heading styles.

New Launchpads start on your account's default Theme. Once a Launchpad uses a Theme, the dropdown can switch it to another Theme but can't remove it.
To change the Theme itself, click Edit theme. Its Launchpad group sets the look of Card, Links List, Links Grid, Flows List, and Launcher, and each can have more than one variant. Theme edits restyle published Launchpads without republishing. To start a new Theme, choose Create new theme in the dropdown. See New Themes and advanced styling.
When you change a themed value on a block or the beacon, a Theme overrides panel lists what you changed. Click the reset icon next to a property to go back to the Theme's value, or click Reset instance to clear them all. The arrow next to it offers Save as new, which keeps your changes as a new variant, and Update original, which applies them to that variant in every experience that uses it.
Container
The General section of the Styles tab sets the container's look:
- Font family: Defaults to Auto, which uses your app's font. Themes don't set the font, so the Launchpad keeps this setting with or without one.
- Primary color: Sets the header gradient and the accent colors, such as bullets, icons, and hover tints.
- Secondary color: Sets the text color below the header, including links.
- Container border radius: Rounds the container's corners, from 0 to 32 px.
With a Theme, the two colors and the border radius follow it. Change one to override it for this Launchpad, and click the reset icon next to it to go back to the Theme's value.
The close button ("x") and title font color adjust automatically based on the background color to ensure high-contrast readability.

Title
Click the Launchpad's title text in the preview to edit it directly.
Beacon
Click the beacon in the preview to open its settings. A floating beacon has three sections:
- Beacon: Padding, border radius, and the background color at rest (Background), on hover (Background Hover), and when clicked (Background Active).
- Label: Turn on Show label to add text to the beacon, then set its color, size, and bold, italic, or underline.
- Icon: Choose a help icon, a chat icon, or upload a custom SVG. Set its color and size.
An inline beacon has the same Label and Icon sections. Its Container section sets the color, border, border radius, spacing, content alignment, and whether it fills the space of its target.
You can show the label without an icon, or the icon without a label. If the Launchpad uses a Theme, a floating beacon follows the Theme's Launcher variant. To use a different one, pick it in Theme variant at the top of the beacon settings. Your edits show as Theme overrides.

Style block cards
Every content block sits on a card. To restyle a card, click the block to open its settings, then open the Card section on the Design tab (the Styles tab for a Flow list). On Links, Flow list, and Image blocks, the block's own section comes first and Card starts collapsed.
The Card section has Background, Border, Corner radius, a Shadow switch, and padding. Without a Theme, cards are white. With a Theme, cards follow its Launchpad Card style, and you can pick another Card variant.
An Image block's Image section has its own Image variant picker and the Alignment setting.

Links block styling
On the Links block's Design tab, the Links section starts with a Theme variant picker when the Launchpad uses a Theme. Below it, choose List or Grid:
- List: Turn Show bullet point on or off, pick a Style (square, disc, or a custom icon), and set its Color.
- Grid: Set the Icon size and Icon background.
On the Advanced tab, edit the CSS for the card, the title, and the link items, including hover and focus styles. Link item styles apply to every item, and new links copy them. Switching between list and grid resets the item styles.

Flow list block styling
On the Flow list block's Styles tab, the Bullet Point section turns bullets on or off and sets their style (square or disc) and color. If the Launchpad uses a Theme, pick a Theme variant at the top of the tab. The bullets follow it, and your changes show as Theme overrides. The Card section below styles the block's card.

Launchpad and Checklist icon merging
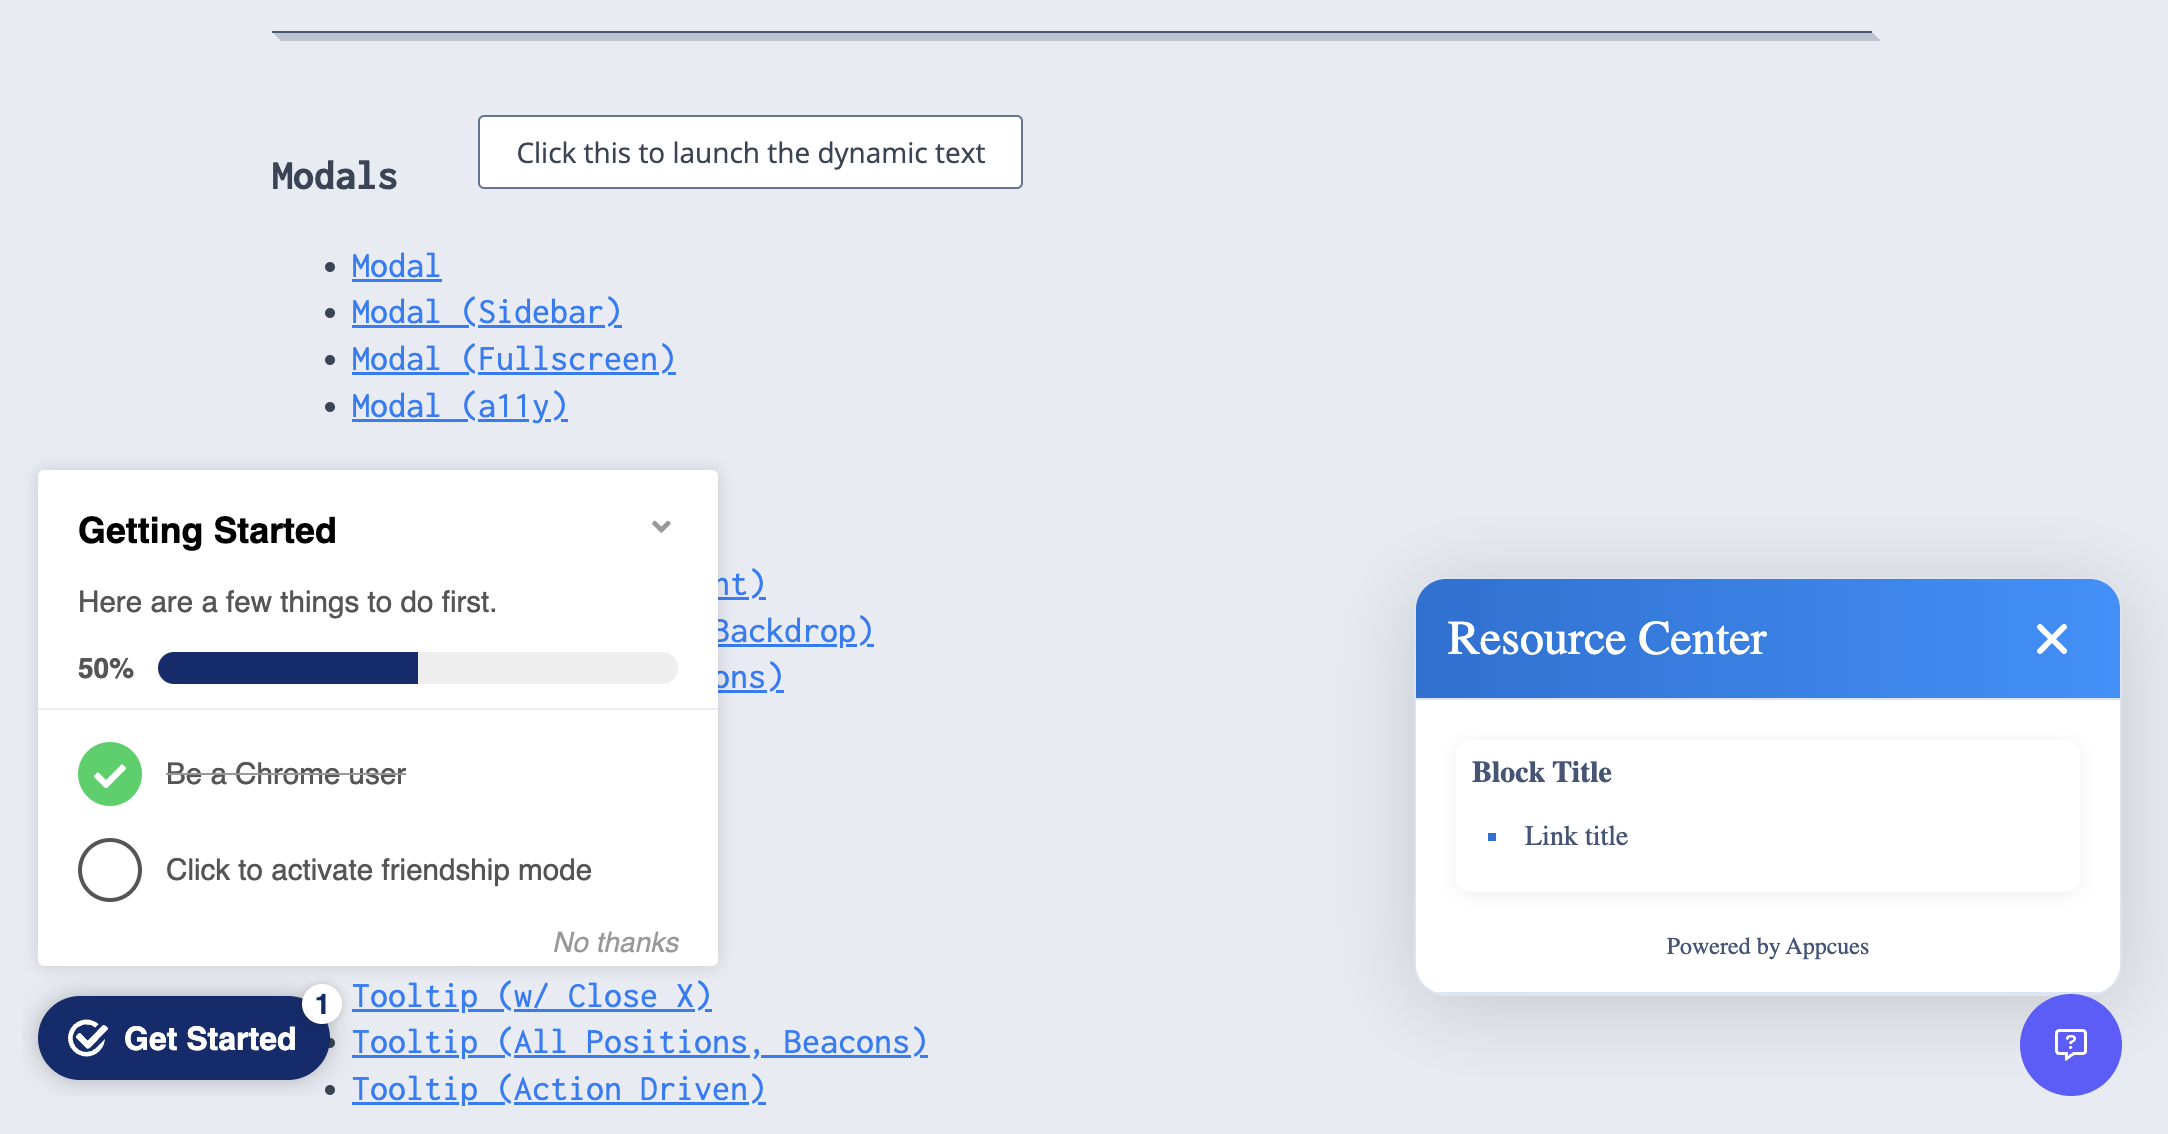
If a user qualifies for both a Launchpad and a Checklist on the same page and the icons would appear in the same location, Appcues merges them into a single combined icon. The user clicks the respective section to expand either the Checklist or the Launchpad.

If the icons appear on different parts of the page, they display as separate icons.
Localize the Launchpad
Launchpads support localization so you can serve your content in multiple languages. You can translate content manually in the builder, upload XLIFF files for bulk translation, or use AI translation to auto-translate into your configured languages.
To set up localization, click the language dropdown in the builder to enable your target languages and start translating.
For full setup instructions — including configuring languages, working with XLIFF files, and AI translation — see Localize experiences.
Translate Flow names in the Flow List block
After a web Flow is localized, you can translate the name the Flow List block shows for it.
- Open the Flow and go to its Settings tab.
- In the Localization section, type the translated name in the Display name column for a language.
- Press Enter or click outside the field. The name saves.
If a language's field is empty, the Launchpad shows the Flow's own name in that language.
Confirm it worked
- Click More actions (⋯) > Preview to check your content and styling. The Chrome extension opens the Launchpad on its Build URL. The Flow list block stays empty in preview, and Javascript blocks don't run until the Launchpad is published.
After you publish to a staging domain or to internal testers, also check:
- A floating beacon sits in the corner you chose and doesn't cover other parts of your app. An inline beacon shows inside its target element, in the position you chose.
- The beacon's icon, label, color, and size match your styling, and clicking it opens the Launchpad.
- Links block items show the right names. External links open the right page, and items that launch a Flow launch the right one.
- The Flow list block shows only the Flows your test user qualifies for, and clicking one launches it.
- If knowledge base search is on, searching a keyword returns articles, and clicking one opens it.
- Colors, font, title, and the bullet or grid styling of each block match your settings.
- If a Checklist shows in the same spot, the two icons merge into one, and the Launchpad part of it opens the Launchpad.
For how to publish to testers and check who qualifies, see Preview and test an experience.
If the Launchpad doesn't appear
- Verify Appcues is installed on the page where you expect the Launchpad. Open the Appcues debugger and confirm all rows show green checkmarks.
- Check that the user meets the Launchpad's audience targeting rules.
- Confirm the page URL matches the Launchpad's page targeting settings.
- See Troubleshoot Launchpads for a full diagnostic walkthrough.
If the issue persists, contact support with a screen recording, the Launchpad's Experience ID (on its Settings tab, in Who changed this), and the user ID of the affected user.