Customize and configure buttons
Learn more about buttons, how to customize them, set an action, track an event and update a user property.
Table of Contents
Buttons control how users navigate through Flows, Pins, Banners and Embeds. You can set what happens when a user clicks a button, style its appearance, track clicks as events, and update user properties — all from the Builder.
Add a button
- Open your experience in the Builder.
- On the step where you want the button, click the + icon and select Button.

Style a button
By default, new buttons inherit their styling from your Theme. Themes support two button templates — Primary and Secondary — that you configure once and reuse across experiences.
To override the Theme on a specific button, select the button in the Builder and adjust any of the following:
- Font and text — typeface, size, weight, and color
- Spacing — padding, margin, and corner radius
- Fill and border — background color, border color, and drop shadow for both the default and hover states
Styling applied in the Builder takes precedence over your Theme.

Set a button action
Every button needs an action. Select the button in the Builder, then choose one of the actions below.
Next step
Advances the user to the following step, or completes the Flow if it's the last step. Use this action on survey steps too — even on the final step — to ensure responses are submitted.
When your Flow navigates across pages, place a Next step button before the navigation step.
This action isn't available on Hotspots. Use Skip to next group instead.
Previous step
Returns the user to the preceding step. This action only works between steps of the same type within the same group.
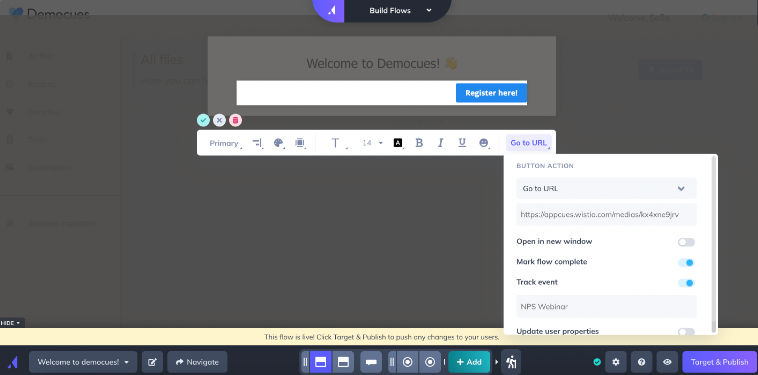
Go to URL
Sends the user to a static or dynamic URL. Toggle Open in a new window to control where the link opens.
To use a dynamic URL, insert a profile attribute into the URL field. The attribute must already exist in the user's profile — typically passed through the Appcues.identify() call.
Check Mark flow in progress as complete if you want this action to count as a Flow completion.
Dynamic URLs display the raw variable in the Builder preview. Test with a live user to see the resolved value. See Test Flows for options.

Trigger Flow
Launches another Flow on the current page or on a different URL within the same domain. This is a manual trigger — audience targeting on the triggered Flow is ignored. Anyone who clicks the button sees the triggered Flow.
To send users to a dynamic URL before triggering, insert a profile attribute into the URL field (same as Go to URL).
This action counts as a Flow completion.
You can't use this to relaunch the same Flow. To create a restart button, make two copies of the Flow and point each one's Trigger Flow button at the other.
The triggered Flow only fires in a live environment, not in the Builder preview. See Test Flows.

Dismiss Flow
Ends the Flow immediately. The user won't see any remaining steps.
Don't use Dismiss Flow on a step that contains a survey form — Appcues can't submit the response if the Flow is dismissed.
Go to custom step
Jumps to a specific step within the same group. Select the target step from the dropdown.

Skip to next group
Advances the user to the next step group. If used on the last step of a Flow, it counts as a Flow completion.

Track an event from a button
Add event tracking to any button to monitor clicks and use them for targeting other experiences.
- Select the button in the Builder.
- Toggle Track Event on.
- Enter a name for the event (for example, "Dismissed Welcome Flow" or "Clicked Webinar CTA").
The event appears as an Application Event in Events Explorer after it has been triggered at least once. For a deeper walkthrough — including how to activate the event, send it to integrations, and use it for targeting — see Track an event from a button.
Update a user property from a button
Buttons can write a value to an existing custom property on the user's profile when clicked.
- Select the button in the Builder.
- Toggle Update User Properties on.
- Choose the property and set the value.
The property must already exist in Appcues — the button can't create new properties. You can initialize it by passing it with a null value in your Appcues.identify() call once; it doesn't need to appear in every subsequent call.
If the same property is later sent through Appcues.identify() with a different value, the new value overwrites whatever the button set.
If the property originates from another tool (for example, HubSpot), the button update stays in Appcues only. To sync it back, use Zapier.
Confirm it worked
- Button action — Preview the Experience in the Builder to verify navigation behavior. For actions that require live data (Go to URL with a dynamic variable, Trigger Flow), use a permalink or Test mode.
- Event tracking — After clicking the button at least once, open Events Explorer and search for your event name.
- Property update — Click the button, then check the user's profile in Users to verify the property value changed.
If something isn't working
- Button doesn't appear — Confirm the step has a button component (not just text styled to look like one).
- Dynamic URL shows the raw variable — This is expected in the Builder. Test with a live user via permalink or Test mode.
- Trigger Flow doesn't fire — Verify the triggered Flow is published and that both Flows share the same domain. This action doesn't work in the Builder preview.
- Event not available for targeting — The event must be triggered at least once before it appears in targeting options. Publish the Flow, use a permalink, and click the button.
- Property didn't update — Confirm the property already exists in Appcues and that the user clicked the button (not just viewed the step).
If the issue persists, collect the Flow URL from Studio, the affected user's User ID, and a screenshot or screen recording, then contact support.