Install Appcues Mobile via Segment Device-Mode Plugin
Guide to help you install Appcues in your mobile application via Segment Plugin
Table of Contents
This is a guided overview to installing Appcues Mobile into your Segment-connected iOS, Android, or ReactNative mobile application. For information on installing Appcues onto your web platform via Segment, check out the guide here!
Interested in our data security measures? Please review our Trust Center for details.
This guide focuses on a mobile installation via Segment for iOS, Android, and ReactNative applications. Looking to install directly? Check out that guide here!
Installing in a web platform? Check out our web installation guide for more info!
Before You Get Started
What Do We Mean by “Install”?
There are a few key components that together create a successful Appcues installation. While this guide will cover these items in more detail, below in a brief overview of what makes an Appcues installation.
Installation requires an hour or more of work for a developer with knowledge of how your app tracks user properties, screens, and events. You will need access to your team's Appcues account and Segment instance to complete the installation.
Segment Components
Already included in your Segment installation, and the data is passed into Appcues via the plugin
- Add the Appcues SDK Script to your Product - Appcues is added to your app to connect to your Appcues account and show the content you've built
- Identify Users and Groups - Tell Appcues when a user is present, and send information about who that user is. This is used for targeting experiences and segmentation
- Track Screens - Recognize where the user is within your app. This is used for screen-based targeting
-
Track Events - Tracking events with Appcues allows you to measure your users' engagement with your app. These events can also be used for targeting and segmentation
Additional Components
Not handled in Segment, and are implemented into your app directly
- Deep Link Support - Used for debugging, previewing, screen capture, and navigation across your app
- Element Recognition - Used with Anchored Tooltips to connect a tooltip to a specific element on screen
- FrameViews - Creates a designated container within your app to display Appcues Embeds
All components are required for full functionality and feature usage of Appcues Mobile
Ready to install via Segment? Continue through this guide for next steps!
Adding Appcues
Required
-
Register Your App(s) in Studio
- This creates your AppIDs, which is used for connecting your app to your Appcues account for building and publishing Appcues experiences
- If you’d like to manage separate instances, you can register an AppID for each, then configure a Destination for each (see Step 2 below)
Don’t have multiple instances, or don’t want to manage them in Appcues? Don’t worry! Flows can be targeted to specific users when testing live.
-
Configure the Appcues Mobile Destination
- In Segment, navigate to Destinations and search for “Appcues Mobile”
- Click “Configure Appcues Mobile”
- In the configuration settings, you'll add:
- Your Appcues AccountID, found on your Account Settings page, and
- Your registered AppID, found on your Installation Settings page
Adding multiple apps? Configure a destination for each AppID generated in Step 1
- Add the Plugin
Configure URL/Deep Linking
Required
- Deep linking is required for debugging, previewing, and screen capture (required for Anchored Tooltips and applying a background in the Mobile Builder). Your app must also be set up to support URL schemes and deep linking
- Select your framework below for more details:
Installation Checkpoint
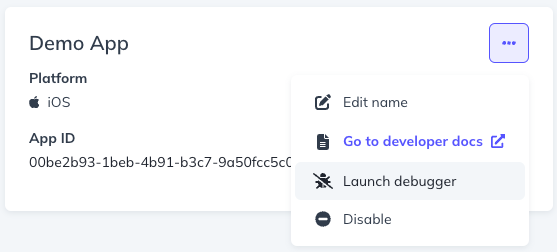
Throughout your installation, you can test and confirm successful implementation by opening the Mobile Debugger in your app using one of the following methods:
- Scan the QR code on your Studio Installation Settings page for each registered app

- Open the Debugger URL on the device you'd like to test
https://mobilebuilder.appcues.com/?type=debugger&appId=[AppID] - Call the
debug()function, or - Run the following through your dev console
appcues-[AppID]://sdk/debugger
We recommend checking the Debugger throughout your installation to ensure users, groups, screens, and events are being properly recognized, as well as to confirm deep linking is configured.
Recognize Screen Elements
Required for Anchored Tooltips
- When using Anchored Tooltips, the screen elements must be recognizable in the captured screen. This allows for secure placement that maintains through different screen sizes or element location on the screen
- Select your framework below for more details:
Build FrameViews
Required for Embeds
- To publish an Appcues Mobile Embed, FrameViews must be configured to store the Embed. These are pre-set containers that are added throughout your app where you would like to host an Embed
- Select your framework below for more details:
Sending Appcues Events to Segment or Other Analytics Tools
Add the Event Listener to your app to pass Appcues events into Segment and other mobile-connected tools (Heap, Amplitude, Google Analytics, etc.)
- Sends the following events:
| appcues:v2:experience_started | appcues:v2:step_seen |
| appcues:v2:experience_completed | appcues:v2:step_completed |
| appcues:v2:experience_dismissed | appcues:v2:step_interaction* |
| appcues:v2:experience_error | appcues:v2:step_error |
| appcues:v2:experience_recovered | appcues:v2:step_recovered |
*Survey responses are included as attributes inside the step_interaction event
- Select your framework below for more details:
Installation Complete!
After completing the steps outlined above, your installation is completed!
It is recommended to review your installation periodically to ensure everything is up-to-date and your custom properties, events, and FrameViews are supporting your use cases.
Having Issues Getting Installed?
If you have any questions or issues regarding your mobile installation, please contact us at support@appcues.com!